Wednesday, March 3, 2010

Short VAST Paver Walkway

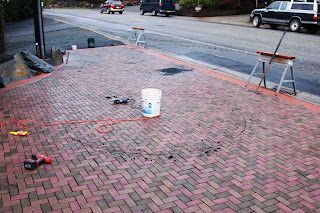
We had a few pavers leftover from the driveway project, so we decided to put them to good use. Today was a good day to work on home projects, because we needed good weather to change a big patio door, so while it rained and blew the guys filled in the afternoon playing with the VAST Pavers. While I ran around looking over several projects around town Kurt and Jud woked on a short walkway that will connect our lower deck to the stairs that lead down from the upper deck.

While Jud was finishing up a bit of window trim on our latest weatherization job Kurt got the ground ready. Here is a birds eye view of Kurt laying out the gird.

Along with doing our best to build as green as we can we love to use local woods, so it seemed appropriate to use Alaskan yellow cedar to edge this walkway. Of course the deck is all Alaskan yellow and red cedar so connecting the stairs to the lower deck with yellow cedar edging was the right thing to do.

Jud lays the last of the pavers.

Jud has a way of putting in the extra effort to finish a job. So, minutes before quitting time he marks and gets ready to cut the last paver. Well not the last, because we are going to do a small inlay in this walkway too. More photos will follow soon.

Monday, March 1, 2010

Pavers are Done

On Sunday in pouring rain Connie and I finished the pavers for our parking area on the street side of our home. After working with the VAST Pavers I’m very impressed with the thought that went into the design of this unique product.

The inlaid compass rose

When people find out that these pavers are made from recycled plastic bottles and rubber tires they tend to be as impressed too.

It was a lot of work, but well worth it.


Sunday, February 14, 2010

Recycle Center

In early January Jud helped me finish a project that I started about a year ago. At my age I like to sit down to put on shoes and we needed someplace to store recyclable stuff before taking it to the recycle center. So, I decided to build a bench that would open up where the recyclable stuff could be stored. Better yet the bench was made mostly with left over wood from various projects.


I love aromatic red cedar, so I have to admit that I did give into an impulse buy urge at the lumber yard. Other than the cedar and the maple that lines the lid all the rest of the bench was made from left over wood.


Jud installs the trim on the bottom of the bench.


The main part of the bench is made out of a leftover sheet of ¾ inch teak plywood that we had left over from the boat the we built. I have been storing this plywood since 1990. So, it was about time I found a project for it.


Saturday, February 6, 2010

Getting Ready For Gardening


Last summer I grew nasturtiums in the far box. At the end of the season I found out that nasturtiums are eatable and I’m told they are very tasty. So, we added another box and this year we will not only grow nasturtiums for the beauty of a flower box, but for food too.


The best place for sun on our property is at the lakes edge, hence the new yellow cedar garden boxes that are mounted on the side of the dock.

Sunday, January 31, 2010

New Truck

Here are some photos of the new truck parked on the VAST Pavers


People are still stopping in to admire the pavers. When I tell them that the pavers are made from recycled plastic bottles and tires most people are very surprised.

Saturday, January 23, 2010

More Pavers

This past week we had several interruptions but we did get more of the VAST Pavers laid. Below are some photos from the past week.

Kurt lays more grid in preparation for the pavers.

As is often the case with me, I changed my mind in the middle of a project. I had planned to do more concrete work, but the pavers looked so good I figured why not do an additional 200 sq feet of them? So, the project is now on hold until more pavers arrive and time and weather let us get back to the job. (This time of year our days start getting longer very quickly. In fact we are gaining more than 3 minutes a day right now. By the time the pavers get here there will be enough light for me to work a couple of hours each evening on the project.)


The compass rose is done. Several people have stopped by to say how much they think the compass rose adds to the project. And, I agree. It was a lot of work, but well worth it.


Grandsons Nate and Blake stop in to lend a hand laying paver. Both boys had been by the week before and both boys had lots of fun putting pavers down. 3 year old Nate had a little trouble with the herringbone concept, but 7 year old Blake caught right on and was soon laying pavers as fast as the rest of us.

Nate shows off his new pink backpack, that he will wear on the kids upcoming 6 week trip to Malaysia. I have never seen a little boy who loves to play with trucks more than this kid, but he also loves pink. He says it is his favorite color.


My trusty 2001 Toyota Tacoma stands ready to deliver one last load of tools to a job site on Monday. As of Monday, my new 2010 double cab Tacoma will be in town and this great truck will transfer into the trusty hands of Jud. (Now that is the way to keep the truck coming to the job site, sell it to one of your employees!)


Connie stands in the middle of the compass rose and shows off her new Lady Bug clogs.

Saturday, January 16, 2010

VAST Pavers

It’s been a long time since I have updated anything on this blog. I guess I got too busy, and possibly I was a tad bored with blogging. But, this latest project of doing our parking area in VAST Composite Pavers has me excited enough to take some time on this rainy Saturday afternoon to upload some photos from the project.

One day while reading an online article about Green Building I came across an advertisement for VAST Pavers. When I saw that the pavers were made out of recycled tires and plastic bottles I got excited. Not only do I love the look of pavers, but here was a Green paver, which is in contrast to the more traditionally concrete pavers. Connie and I knew we wanted to do something attractive with our parking area and here was the solution of doing it in a green way. I got so excited I asked VAST to be their dealer here in Sitka and the agreed. In fact Southeast Cedar Homes is now the 1st dealer in Alaska and this is the first time VAST Pavers have been used in Alaska. I’m going to be working hard to make sure that it is not the last time these very cool pavers are used here in Alaska!


The D-1 gravel has been removed and 1" minus drain rock has been added.


Forms are being built and rebar is being added.
Almost ready to pour.


We ordered brown dye for the concrete so I was a bit surprised to see that is was red. Here is how we get the wrong color. When I ordered the dye Stacy at Sitka Ready Mix told me to look online and get the number for the color off the color charts. So, I did and told her that the number was 160. So when the wrong color showed up I went back online to see who’s mistake it was. Can you believe that the website showed two #160’s? Yip, you guessed it there is a mistake on the website and if I had to bet I’d guess the real number should have been 1600. Oh, well once the concrete was mixed and we were ready to pour I figured the red would be just fine. And, I think it is.
Fortunately my son Zach in the red shirt showed up to help us pour. And, of course it was raining.


I have to give praise where praise is due. Sitka Ready Mix's driver Daryl is the best!

I have poured a lot of cement over the years and I have to say that I use to hate it. I think that was because the cement truck driver’s always were putting pressure on everyone to hurry up and get the job done. In fact I’d have to say that most of the past drivers I have worked with were usually total jerks. But, not Daryl. He is by far the best cement truck driver that I have ever been around, and I’d have to say the hardest working one too. Daryl takes all the pressure off the guys that are pouring and he makes the job go smoothly. I’d also bet that he is more efficient than any of the Hurry Up Drivers. In fact I know he is.


Speaking of giving praise where praise is due I also have to say what good employees I have. Here you see Jud and Kurt stacking all the pavers in the garage in readiness for installation.

Jud is the guy with the stack of pavers and the big smile on his face. Jud is not only one heck of a nice guy, but he can out work 2, maybe 3 guys any day of the week. He is one of those very rare guys who thrives on hard work, and seems to love it.


Now that is one heck of a stack of pavers!


The first pavers are starting to go down on the interlocking grid work. Note that the grids are on top of a permeable ground cloth. This will keep the fine sand from eventually leaching into the drain rock. Which could keep the drain rock for doing the job of draining the parking area.


This is the progress of laying pavers after the first 6 hours of laying them.


We are starting to cut out the compass rose .


Jud glues down the pavers on the edge of the cut. And, in the background you can see one of the other Sitka contractors stopping in to see what the heck we are doing.


The compass rose is starting to take shape.

I’ll be posting more photos as the job progresses.

Saturday, April 4, 2009

2nd Woodshed

With a small lot and limited space it was a challenge to find a location to build an additional woodshed. As you will see from the photos the new woodshed was built on rough cut yellow cedar 4X4 posts.


I ran out of deck sealer, so I still need to get a bit more sealer on the yellow cedar post and stairs, etc. These stair treads like all the stair treads on our decks are mortised into the stair jacks.


This is the view looking down on the old and the new woodshed as seen from the entry deck that runs from out garage to our house. The door in the photo is the door to our guest apartment that is located under out garage


Since the new wood shed could not be built parallel to the garage because of the terrain I decided to build the roof of the shed parallel to the garage roof. Rough cut red cedar 2X6’s make up the roof decking in both sheds. This keeps roofing nails from sticking through as they do on a plywood roof.


As they say firewood heats a person more than once. Since both of our wood sheds are down a set of stairs from our living area that means that the wood needs to be carried first down then back up the stairs. Of course there is also the chore of splitting wood. As you can see in the photo I keep my exercise equipment near were it will be used. Who needs to go to the gym when you have a wood stove?


Since it can take a good year to truly “season” firewood so that it is dry enough to get the maximum btu’s out of each piece of wood I wanted 2 woodsheds. This will give me enough room to keep ahead of the curve of supply and demand.

Friday, April 3, 2009

Yellow Cedar Dock

Before we started construction on our home we had already looked into building a dock. Since Swan Lake is a shallow lake that is mostly surrounded by what I’d call a marsh, it is very hard to launch a boat from the shore. Hence, the dock that extends over the marshy area into water that is deep enough to launch and tie up a small boat.


I had always heard that getting an Army Corps of Engineers Permit was nearly impossible. But my experience has not shown this to be true. We of course consulted with the Corps when we built our house and found at that time the guidelines to build were simple to follow. When I applied for a permit to build the dock I again found it very easy and the Corps responded quickly and issued a permit for the dock.

The dock was build under Army Corps permit POA-2006-33

We hand dug holes through the grass and other organic material until we hit a layer of fractured rock at about 3 feet of depth. We then hand drove 1 inch galvanized pipe another 4 to 8 feet through the fractured rock until it refused to drive any further. Then Commercial Sonotubes were used as forms to pour 1 foot diameter concrete piers to support the deck girders. All in all we pour 2.5 yards of concrete for the project. The first yard of concrete was transported by wheelbarrow and the remainder of the concrete was carried in 5 gallon buckets.


Jud drills a pilot hole for one of the last spikes that holds the dock bull rail.


I though it would be fun to cast the shape of a duck and a swan into the concrete bulkhead that holds the dock to the shore.


We had never planned on using any pressure treated lumber because I did not want any toxic chemicals leaching into the lake. I was pleased when I read the Corps Permit requirements that banned the use of most treated lumber for any dock on this lake.

I of course am a very big fan of Alaskan Yellow Cedar. In my experience yellow cedar will out last most pressure treated lumber, it’s less expensive than pressure treated lumber, it grows locally and it is much less toxic to work with, so why in the heck would I use pressure treated lumber anyway!

When we applied for the permit we were told we were the first people to ever apply for a permit to build a dock on Sitka’s Swan Lake. This means this is the first legal dock to be built on the lake. Of course there is only a hand full of dock on the 22 acre lake anyway, but it’s nice to know ours is a legally built one.

Sunday, March 15, 2009

The Boys

It has been ages since I uploaded anything to this blog. So, here are 2 recent photos of grandsons Blake and Nate


At 7 years old Blak shows us the latest tooth that he lost a couple of weeks ago.

Just before the boys along with their parents flew to California Blake gave Nate this extra cute hair cut.
One of these days I will get around to taking photos of recent projects on the house and post them too.

Sunday, August 3, 2008

Guest Apartment

The area under our garage has gone through several incarnations during the finishing of the area. What started out as storage area evolved into an office/ family room and then into a guest apartment. In time the area still might be an office and I’m sure we will still use it as a family room too. But for now it is functioning as a guest apartment.

Below are a few photos taken a week or so ago right after I got the final inspection from the city building inspector.


Building codes and zoning codes are sometimes weird things. You will note the top of the Kitchenette has had the burners removed. This is because with burners the area would be considered another inhabitable living area and by zoning we can not do that since we are zoned R-1. Now, if I wanted to connect the house and the garage together then it would be ok because then our home would be a duplex. Or, I can put a hot plate on the area that is now a breadboard and that would be legal. All I have to say is “Go Figure.”


Guest bed and closet. The carpet is an industrial grade carpet tile. This is the first time I had laid carpet tiles and I have to say it was not only easy but I like it too. If I’m ever looking for a project I’ll build a headboard for the bed.


Very empty bookshelves will be filled with books as we dig them out of storage and off our overflowing bookshelves in our house. In time I will build a table but for now a card table will do.


A very small shower.


The heat in this 420 sq. foot room is from the 4kw heater you see in the photo. The countertops are granite tiles and the backsplash is stainless steel tiles.

Because of the concrete pillars that hold up the 2nd floor garage the walls are a full foot thick. The walls are double insulated with 2 layers of R-11 insulation. The sub-sheeting is left over plywood from cement forms and the framing is left over 2X4’s from cement forms. The inside paneling is 1X4 vertical T&G Sitka spruce, and western hemlock. The horizontal paneling is 1X8 T&G western red cedar.

Tuesday, May 6, 2008

Building Green

Building Green

By: Marcel LaPerriere

Sorting fact from hype is not always easy. Building green is no exception. Over the last couple of years I have been doing a fair bit of research on building green both because I think it is the right thing to do and because I’m working with several clients who want to build green. Recently I was working with a woman who had a very nice modern home designed. The architect was encouraging her to build this home using steel. And, in fact he had even recommended a steel home manufacturing company that not only claimed to be Green, but even has the LEED* endorsement. Sorry, there is no way you will ever convince me that you can build a residential home using steel and consider it green. Here is why:

10% of all greenhouse gases admitted into the atmosphere come from the manufacturing of steel and concrete. Not to mention that 1/3 of the steel produced globally comes from China, where there are few environmental laws. This doesn’t even take into account the amount of fuel required to transport steel to this country from half way around the world. Even though most steel produced today comes from about 40% recycled steel, massive amounts of iron and other minerals have to be extracted from the earth to make steel. Steel of course also requires tons of coal to manufacture. Even well insulated steel walls will never be as energy efficient as wood walls. So, I have to wonder how any manufacture of steel homes can make the claim of being Green.

In my opinion one way to build green requires the builder to substitute wood whenever possible. This is just one of the reasons I’m fond of the Pan Abode Phoenix System. Solid wood walls greatly reduce another product that requires mining and vast amounts of energy to produce, and that is sheetrock. Did you know that 17% of all sheetrock manufactured gets thrown away without being used because of cutouts for windows, doors and hanging sheetrock to minimize seems? The Phoenix System also reduces the amount of fiberglass insulation that is required, thus saving the mining of silica and massive amounts of energy to produce the fiberglass insulation.

All too often I hear that solid wood walls are not energy efficient. I beg to differ. By making walls air tight and doing a good job of insulating in areas of high heat loss like the floor and ceiling, installing good thermal doors and windows and taking advantage of the thermal mass of wood, a truly Green home can be built.

With few exceptions wood is the only building material that will regenerate its self. And, while it is regenerating it is absorbing CO2 from the atmosphere. Producing a steel stud requires 9 times more energy to produce than the equivalent wood stud. Not to mention that wood has over 400 times the resistance to heat transfer than steel. In my book there is no better way to build Green than using wood. In fact a study by the Edinburgh Center for Carbon Management (ECCM) found that by substituting wood whenever possible in the construction of homes that an 88% reduction in greenhouse gasses can be accomplished.

To truly build green you have to take into consideration: resource extraction, product manufacturing, transportation, installation, heating and cooling, longevity of the material in the building, and the eventual disposal of the material when the building is torn down. Through the whole life cycle of the building from resource extraction to disposal no building material has a lower overall carbon footprint than wood.

My motto is “Build Green, use wood!”

* Leadership in Energy and Environmental Design a standard set by the US Green building Council.

Sunday, May 4, 2008

Jenn's Birthday

Yesterday was our daughter-in-laws birthday. This is a picture of
Blake writing Jenn and two hearts in the icing of the Birthday cake.


Nate is telling Grandpa how big a piece of cake he wants.


I think Jenn doesn't have a big enough spatula for Nate's piece
of cake, or a large enough cake.